
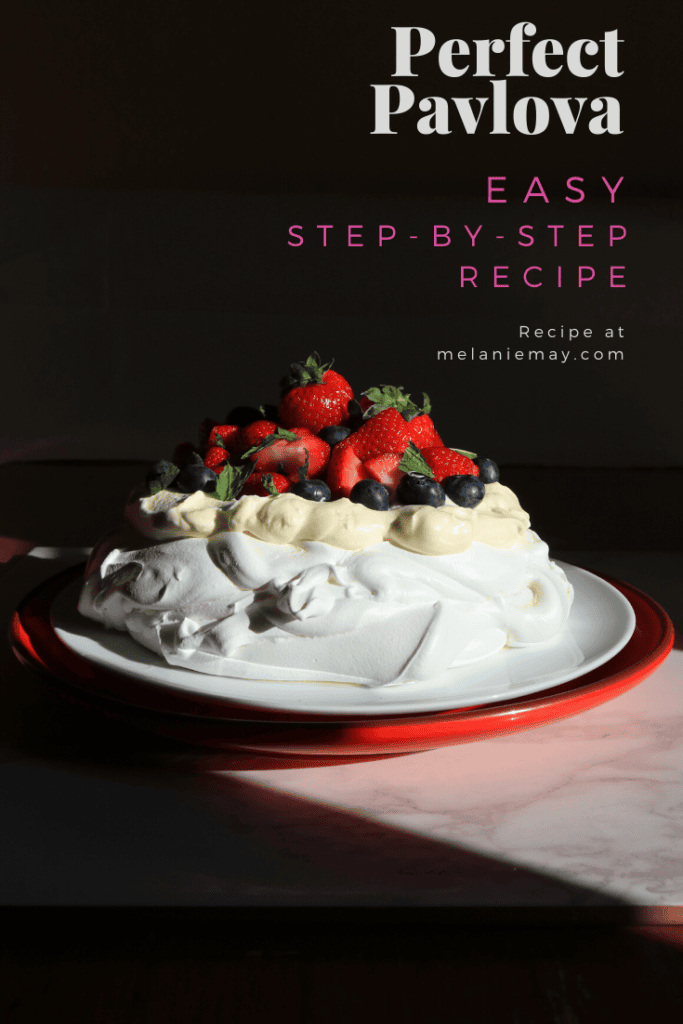
Pavlova recipe with step-by-step photos and instructions. Here’s how you make pavlova that turns out perfect every time.
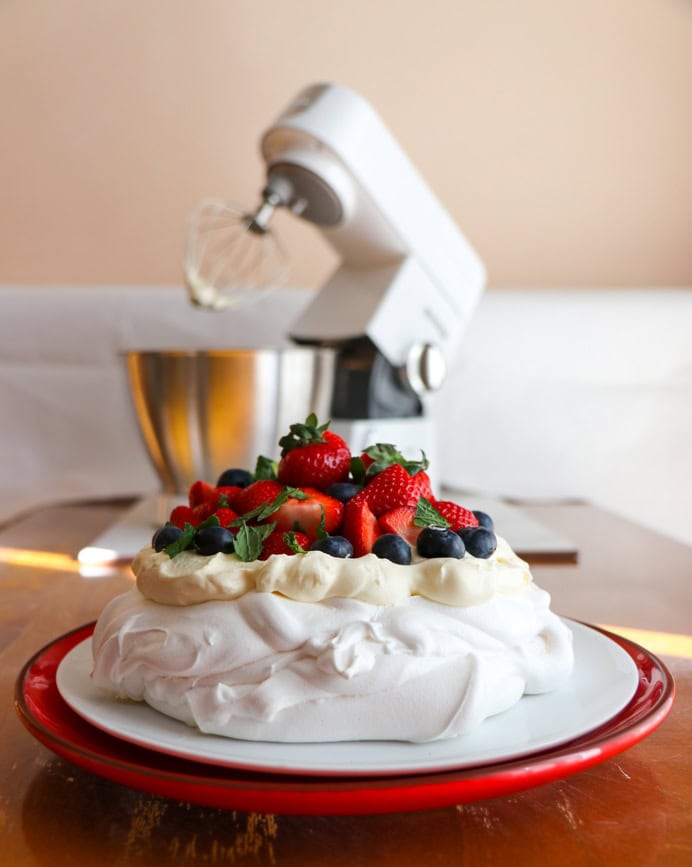
Discloser: I made this pavlova recipe using the Kenwood Chef stand mixer which was gifted to me from Kenwood. However, you can make this recipe without a stand mixer, and I’ll show you how.
Pavlova cake is an ideal dessert to personalise and add your twist. This recipe will show you the basic principles, but you can riff on the theme. For example, you don’t have to use whipped cream as the pavlova filling and you can use any toppings that you like.
Not only is this pavlova recipe gluten-free, but you can also make it dairy-free too. What did I tell you? Pavlova is the perfect dessert to adapt to your taste.
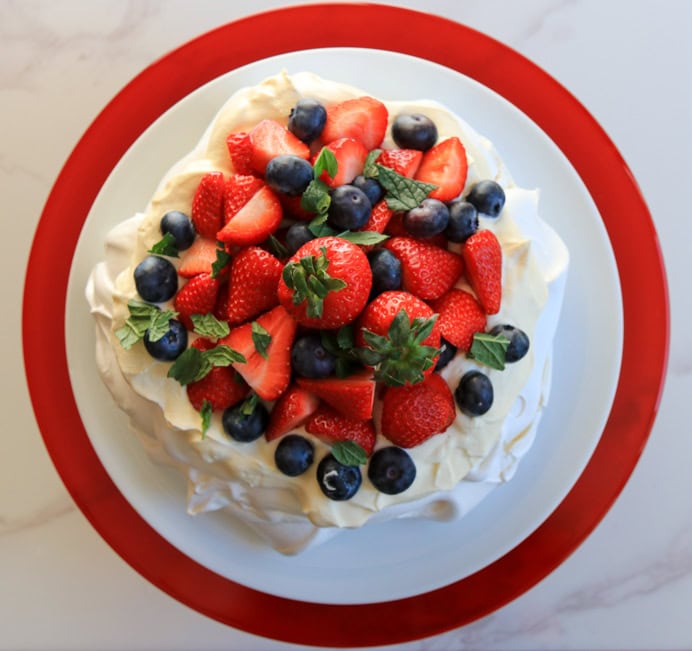
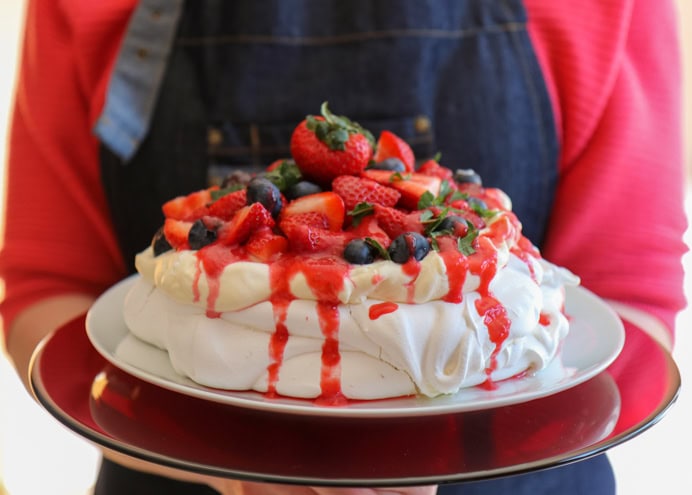
My pavlova recipe uses unsweetened whipped cream topped with strawberries as they were in season and blueberries, and is drizzled with homemade raspberry coulis and topped with mint leaves.
OK, let’s break down what makes a great pavlova.
First off, let’s look at what is the difference between a meringue and a pavlova.
A basic meringue recipe is just egg whites and sugar. There are three types of meringue, French meringue, Italian meringue and Swiss meringue and the difference is when and how the sugar is added. You can read more about the different types of meringue over on the Fine Cooking website.
Meringue mixture is used to lighten cakes, mousses and soufflés. Meringue also tops pies (think lemon meringue pie), makes desserts like baked Alaska and can be used to decorate cakes. Crisp baked meringues are also a sweet treat in themselves.
Pavlova is a type of meringue but with added ingredients to make the middle light, soft and fluffy – like a marshmallow. The ingredients you can add to pavlova to make the centre fluffy are cornflour, cream of tartar vinegar or lemon. Which ones you use all depends on the recipe. For example, Delia Smith’s pavlova recipe doesn’t use cornflour or cream of tartar or lemon or vinegar.
Why do you add vinegar to a pavlova recipe?
You can use lemon or vinegar interchangeably. This recipe uses lemon but you can use white vinegar if you prefer. If you don’t have lemon or vinegar you can use cream of tartar instead (it is an acid like the lemon and vinegar). The acid helps to stabilise the whisked egg whites and hold onto the air whisked into it and stops them from collapsing.
What does cornflour do in a pavlova recipe?
You don’t have to use cornflour but I do as it stops the eggs from drying out and overcooking but only use the recommended amount. Too much cornflour in your pavlova can give the centre a floury texture.
How do you separate eggs?
It is easier to separate cold eggs. This is because the eggs are firmer and the yoke is less likely to break. However, it is better to whisk egg whites when they are at room temperature. Therefore, if you can, put the eggs in the fridge an hour or so before you separate them. Then, leave the eggs whites sitting out until they come up to room temperature. This should take around 15-20 minutes. When it comes to baking, room temperature is roughly 21°Celsius (70°Fahrenheit).
Don’t throw out those egg yolks. Put them in an airtight container and cover with water and keep them in your fridge until you are ready to use them in custard, carbonara, brioche, cookies etc., or my Pastiera Napoletana Italian Easter cake recipe.
Classic pavlova filling
Traditional pavlova recipes use whipped cream. The best cream for whipping should contain at least 30% fat. I love using double cream for my whipped cream. However, as mentioned, you can use whatever you like for the filling. You can use Greek yoghurt, mascarpone, crème fraîche, fromage frais or a mixture. If you want to make a dairy-free pavlova recipe you could use coconut milk, coconut cream, or curd, umm lemon curd.
Pavlova toppings
And when it comes to pavlova toppings, well, this is where you can go as wild or mild as you like. Choose your favourite fruit and add coconut, nuts, seeds, dried fruit, chocolate, hokey-pokey, salted caramel sauce, coulis, curd, honey – whatever your heart desires.
Components of a perfect pavlova recipe
The perfect pavlova is a wonderful combination of contrasting textures and tastes.
For me, the perfect pavlova should have a sweet, crisp meringue base with a chewy centre.
This crisp, sweet base should be buffered by billowy soft, unsweetened cream.
The topping should also have some tartness to it to balance out the sugary base. Sour fruits like kiwi, blackcurrants, raspberries, passionfruit, gooseberries and ruby grapefruit are perfect pavlova toppings. Or you can use a mixture of sweet and sour fruits like I did. I used sweet strawberries and tart blueberries.
If you want to add some extra tartness or sourness to your pavlova, you could drizzle with a coulis made with lots of lemon juice. This is what I did and it was a lip-puckering contrast to the sweet strawberries and sugary meringue. You could also spoon over lemon curd, passionfruit or just squeeze some citrus fruit juice on the top.
So what filling and toppings are you going to choose?
For a step-by-step video Pavlova recipe, head over to my Instagram account and check out the ‘Pavlova’ highlight on my profile.
OK, on to the recipe (finally, I hear you say)
Perfect Pavlova Recipe
Pavlova Recipe Prep
Preheat the oven to 150°C / 130°C fan assisted / 300°F / gas mark 2.
Draw an eight-inch circle on the back of a sheet of parchment paper.
Use this paper to line a baking tray.
Pavlova Recipe Ingredients
For the perfect pavlova base
6 egg whites
350 grams of caster sugar
2 teaspoons of cornflour
2 teaspoons of lemon juice or vinegar
1 teaspoon of vanilla extract
For the perfect pavlova filling
250ml of double cream
For the perfect pavlova topping
300 grams of strawberries
100 grams of blueberries
For the raspberry coulis
125 grams of fresh or frozen raspberries
30 grams of icing sugar, more if needed
1 tablespoon of fresh lemon juice, more if needed
Pavlova Recipe Method
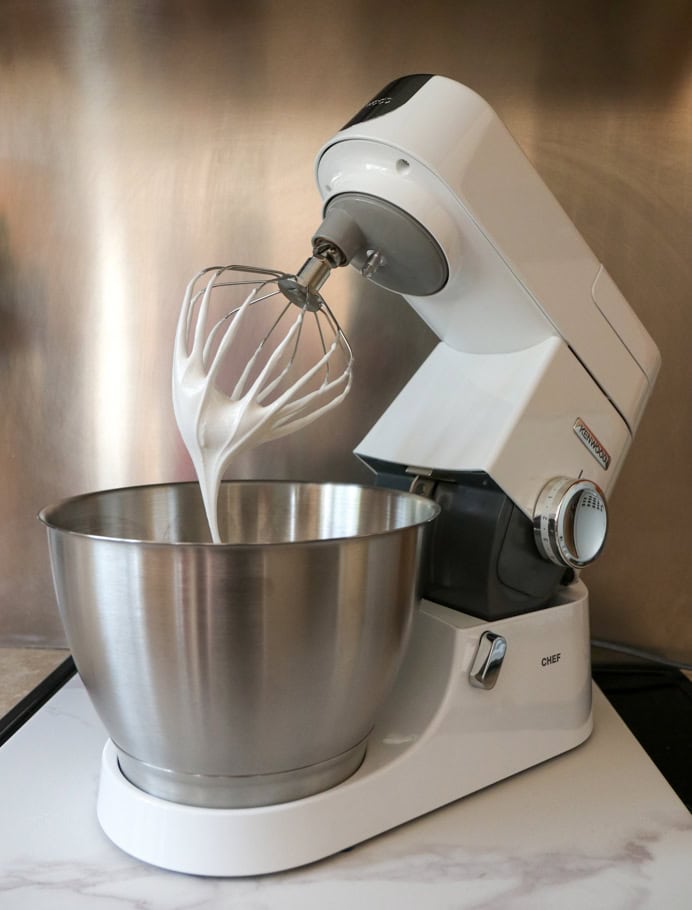
You can whisk the eggs by hand or use electric beaters. I used my Kenwood Chef stand mixer with the balloon whisk attachment.
You need to make sure your bowl is free from any grease. I take a cut lemon and rub it around my bowl before I start. This removes any residue.
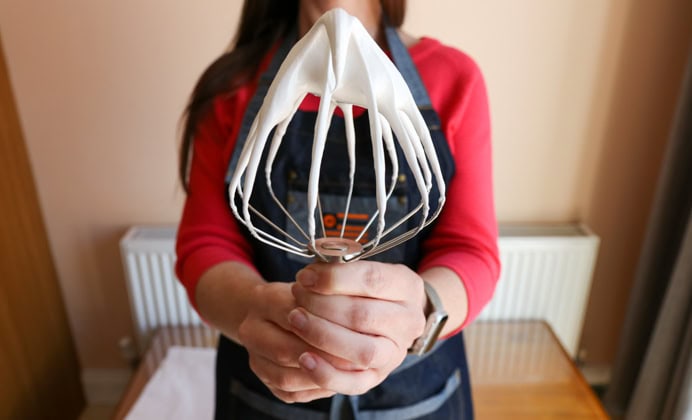
Add the egg whites to the bowl and on medium-high speed, whisk until they form soft peaks. This took about one-minute with my stand mixer.
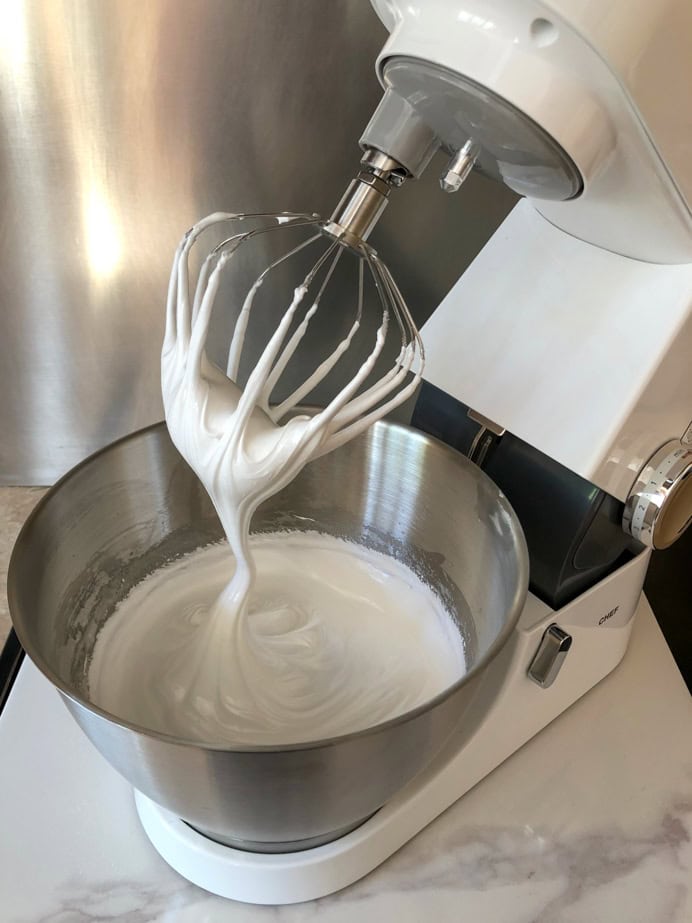
Turn your whisk down to a low speed and add the caster sugar one tablespoon at a time. The key to whisking the egg whites is to do it low and slow as you need the sugar to dissolve into the egg whites. You want each spoonful of sugar to be dissolved before you add the next. This took 15 minutes with the Kenwood Chef stand mixer. I stopped a couple of times during this process to scrape down the side of the bowl.
Your meringue is ready when the mixture looks glossy and forms stiff peaks and all the sugar has dissolved. To check this, take a bit of the mixture between your thumb and index finger and rub them together. If the mixture feels silky you are good to go. If the mixture feels grainy you need to mix some more. Try and check the mixture more than once from different parts of the bowl.
Sugar choice: caster sugar has smaller crystals than granulated sugar and will, therefore, dissolve more easily when beaten.
If the sugar has not fully dissolved your pavlova may weep. And nobody wants a weeping pavlova. How sad! So, to stop your pavlova from weeping, mix and mix some more until every grain of sugar is dissolved. This is one of the keys to a perfect pavlova.
In a separate bowl add the cornflour, lemon juice and vanilla extract and stir until the cornflour has dissolved.
Take the egg white mixture off the stand mixer and with a spatula or spoon gently fold the cornflour mixture into the egg whites. You want to do this as gently as possible so as not to knock any of the air out of the egg whites.
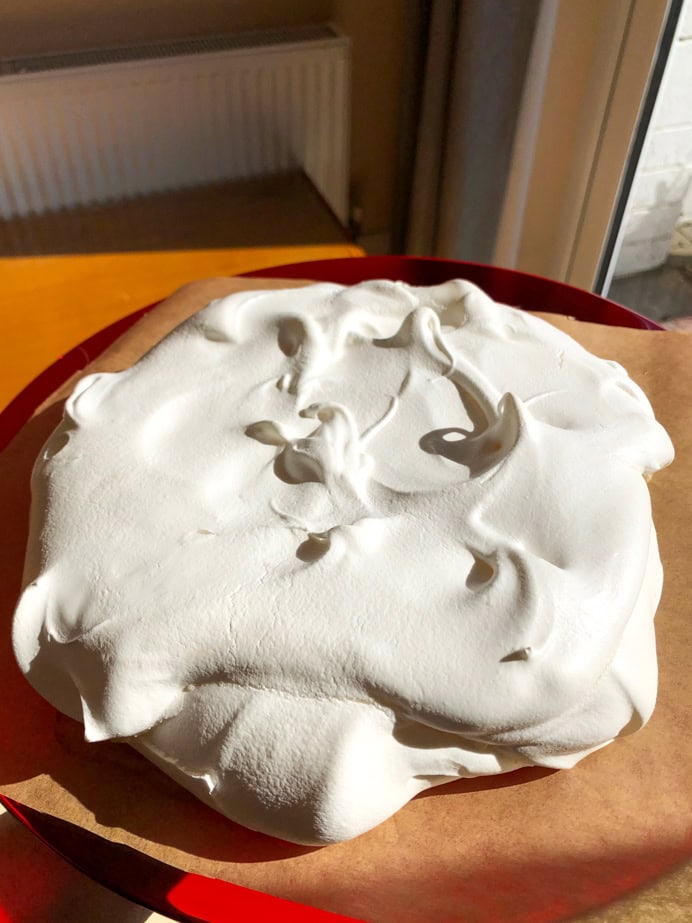
Take your lined baking tray and pile all the mixture onto the middle of the circle that you drew on there.
Using a palette knife or the back of a big spoon just slowly smooth the mixture outwards to fill the circle.
I think the key to getting a tall fluffy pavlova is not to play with the mixture too much. You want to just get it into the oven as soon as possible so don’t spend too much time trying to make it look perfect. Remember, most of the pavlova will be covered in a billowing cloud of cream. However, I do try to make a little hollow in the middle of the mixture so that my cream can sit neatly in there.
Put the base in the preheated oven and gently close the door. Set a timer for ten minutes.
When the ten minutes are up, turn the oven down to 110°C / 90°C fan assisted / 195°F / gas mark 1/4. Set a timer for 90 minutes.
Do not open the oven door during the cooking process.
When the 90 minutes are up, turn off the oven and leave the pavlova cake in there to cool for a few hours.
It is this low and slow baking that keep the pavlova base white. Look how white mine is in the photos!
Making pavlova in advance
You can make the pavlova recipe meringue base a few days in advance but you need to store it in an airtight container. Merangies absorb moisture and if not stored correctly can become chewy. For added protection, wrap the pavlova base in clingfilm and then put it in an airtight container. Store the pavlova base in a cool, dry place like on your kitchen counter, in your pantry, or in a cupboard where temperature and humidity are consistent.
I recommend assembling your pavlova right before you are going to serve it. The crisp pavlova base will get soggy from the toppings so it is best to make it right before you serve it. However, you can prepare the toppings a little in advance to speed up the assembling process.
How to make whipped cream
It is best to use cold cream, straight from the fridge.
Pour into a big, clean, cold bowl. For a perfectly balanced pavlova, we do not want to sweeten the cream. We also want perfectly whipped cream that is soft and silky, not over-whipped cream that looks curdled and feels grainy. It only takes a few minutes using an electric whisk or stand mixer and not too much longer using a hand whisk.
If using an electric whisk or stand mixer, choose a medium speed setting. Whip the cold cream for a few minutes until you get medium peaks. Medium peaks will hold their shape pretty well. When you lift the whisk, the cream peaks will bend over at the end.
The cream will roughly double in size when whipped.
You can make whipped cream a few days in advance and store it in an airtight container in the fridge. Just give it a gentle whip before you use it.
Perfect pavlova toppings
To keep the pavlova interesting, use a mix of whole fruits and cut fruits and add something on top for crunchiness like toasted nuts or coconut or chocolate shavings.
For my perfect pavlova recipe, I used whole blueberries and a mixture of whole and cut strawberries and I topped with a sour raspberry coulis.
How to make raspberry coulis
Use about a quarter the weight of sugar to raspberries to start and a tablespoon of lemon juice. Then adjust to taste.
Put the raspberries, icing sugar and lemon juice in a blender or food processor and blitz until blended. Of course, you can just make this by hand by mashing the raspberries with a fork in a bowl and then whisking in the icing sugar and lemon juice.
If the raspberry coulis is too sweet, add lemon juice. Add one teaspoon at a time and taste as you go along until you get the perfect coulis.
If your raspberry coulis is too thick, add a liquid like water or more lemon juice or liquor.
If your raspberry coulis is too thin, I would add more sugar to bulk it out. I would then put it in the fridge as it will thicken as it chills.
Add vanilla extract, or liquor like Chambord, Grand Marnier, framboise, kirsch or amaretto for an added layer of flavour.
Push the raspberry mix through a sieve into a bowl. This will remove any lumps and give you a smooth coulis.
The raspberry coulis will keep for up to a week in the fridge and you can freeze it too.
Uses for raspberry coulis
Apart from drizzling on top of your perfect pavlova, you can use raspberry coulis on chocolate desserts (raspberry and dark chocolate are one of my favourite food combinations). It pairs perfectly with anything lemon especially my lemon yoghurt cake. You can drizzle it over almost anything, to be honest, ice cream, cheesecake, meringue, loaf cakes etc. It is also lovely in porridge, in granola and yoghurt.
Oh, and it is mouthwatering when served alongside baked brie or any other baked cheese.
Assembling the perfect pavlova
As mentioned, it is best to assemble the pavlova right before serving, but you can make the base and whipped cream and prepare the toppings in advance to save time.
Top tip: melt some white chocolate and brush this on the top of the pavlova meringue. Allow this white chocolate to dry. This layer will act as a buffer against the cream and fruit and will keep your pavlova from going soggy.
Place the whipped cream in the centre of the pavlova base. You can pipe the cream if you like but I just spooned it on.
I did the same with the fruit. I just piled everything on top and didn’t try to make anything look too pretty. But I think pavlova desserts just look stunning no matter what. If like me, your decorating skills or piping skills aren’t great, a pavlova is a great option for a showstopper dessert that looks beautiful without spending hours on decoration.
I added some fresh mint leaves to add vibrant flavour and colour.
If you are using a coulis or sauce or honey or curd just drizzle it on top of the pavlova and let gravity do its work. I think pavlovas look so pretty when the colourful sauces run down the sides of the perfectly white meringue.
And there you have it, a pretty perfect pavlova dessert.
I hope this step-by-step pavlova recipe showed you how to create your perfect pavlova. As I said, it is a great dessert to personalise by adding your twists and variations. I cannot wait to see what you created. Show me in the comments below or on my social media channels.
If you have any questions about the steps in this pavlova recipe or on how to make a pavlova please get in touch and I’ll do my best to help you.
Happy baking.
Kenwood gifted me the Kenwood Chef stand mixer, but as always all views are my own and always honest.
If you liked this recipe you might also like my recipe for lemon yoghurt cake.
I highly recommend you check out my recipe for an easy frosted chocolate cake with salted caramel sauce.
For a lovely loaf cake, my spice cake recipe is pretty perfect to enjoy with a cup of coffee or rum!
Finally, for an all-American classic, check out my Mississippi mud cake recipe. It is delicious if I do say so myself.


I have wanted to make a pavlova for a long time but needed the perfect step by step guide as my mum has always been the pavlova queen in our family, I think with this post i’ll be able to steal the crown!
You make favorite dessert sound doable, I like that. probably will try it at home
Oh my goodness I love pavlova! It’s one of my favourite desserts and I’ve not had it in so long (often I’m too lazy to make dessert look pretty and end up throwing together an eaton mess!), I have so many good memories of having it as a kid and my mum telling my the story of how it was made for Anna Pavlova.
This is one of my fav summer time desserts! So lIGht and airy
I don’t know what a pavlova is, but this looks soooo good and YUm!!! want to have some, right now. 🙂
This dessert looks so delicious! I go for gluten-free options & also like fruits. You’ve got nice photos.
I have never tried making Pavlova before, but I do order it whenever available from restaurants we visit. I want to try making this at home. Thanks for your tips and helpful guides. Hopefully, I will be able to be successful.
Tried, tested and true. Lovely results.
I’ve never made a pavlova bus as a deeper lockdown looms here in the north-east of England it looks like I’m going to have more time to bake than in recent weeks. Here’s to a tasty recipe.